DIY Microgreens with Coir Microgreen Sheets
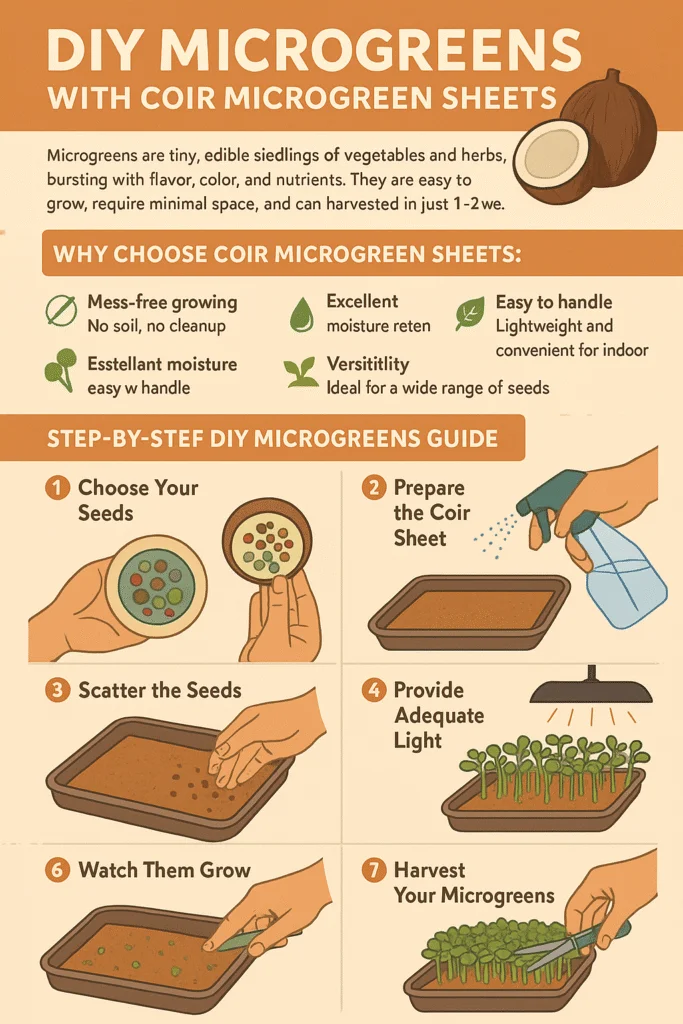
Microgreens are tiny, edible seedlings of vegetables and herbs, bursting with flavor, color, and nutrients. They are easy to grow, require minimal space, and can be harvested in just 1–2 weeks, making them perfect for home gardening enthusiasts, kids, and urban gardeners. Using coir microgreen sheets makes growing these little greens cleaner, faster, and more sustainable than traditional soil methods.
Why Choose Coir Microgreen Sheets?
Coir, made from coconut husks, is a natural and eco friendly growing medium. Unlike soil, coir is lightweight, easy to handle, and retains moisture exceptionally well, creating the perfect environment for seeds to sprout. Coir sheets are pre formed mats that can hold seeds evenly and simplify the watering and harvesting process. They are reusable, mess free, and biodegradable, making them a smart choice for anyone looking to grow fresh, homegrown microgreens sustainably.
Some benefits of coir microgreen sheets include:
- Mess free growing: No soil, no cleanup.
- Excellent moisture retention: Coir keeps seeds hydrated consistently.
- Sustainable: Made from renewable coconut husks.
- Easy to handle: Lightweight and convenient for indoor use.
- Versatile: Ideal for a wide range of seeds like radish, broccoli, mustard, basil, and more.
Step by Step DIY Microgreens Guide
- Choose Your Seeds
Start by picking the seeds you want to grow. Popular choices for microgreens include radish, broccoli, mustard, kale, arugula, and herbs like basil and coriander. Each variety has unique flavors and nutritional benefits, so feel free to mix and match for a colorful tray. - Prepare Your Coir Sheet
Place the coir microgreen sheet in a shallow tray. If the sheet is dry, lightly mist it with water to ensure it is evenly moist. Coir’s natural structure helps water distribute evenly, giving seeds the consistent moisture they need to germinate. - Scatter the Seeds
Evenly sprinkle the seeds over the coir sheet. Avoid overcrowding to give each seed enough space to grow. Lightly press the seeds into the coir to ensure good contact, but do not bury them microgreens grow best when seeds are on or just under the surface. - Water Carefully
Mist your seeds with a spray bottle to avoid washing them away. Keep the coir sheet consistently moist, but avoid overwatering, which can lead to mold growth. A light daily mist is usually enough. - Provide Adequate Light
Place your tray in a bright, sunny spot, or use a grow light if natural sunlight is limited. Microgreens need about 12–16 hours of light per day to grow strong and healthy. Rotate the tray occasionally to ensure even growth. - Watch Them Grow
Within 7–14 days, you will start to see vibrant green shoots emerging. Microgreens grow quickly, so it’s important to monitor moisture and light daily to ensure they thrive. - Harvest Your Microgreens
Once your microgreens reach 2–4 inches tall, they are ready to harvest. Using scissors, cut just above the coir sheet, leaving the roots behind. Rinse gently if desired, then add them fresh to salads, sandwiches, smoothies, or as a garnish for meals.
Quick DIY Microgreens Checklist
- Choose your seeds (radish, broccoli, basil, etc.)
- Place coir sheet in a tray
- Sprinkle seeds evenly
- Mist daily to keep moist
- Provide bright, indirect light
- Monitor growth for 7–14 days
- Harvest with scissors
- Enjoy fresh, nutrient packed microgreens
Tips for Success
- Rotate trays to ensure even light exposure.
- Avoid overwatering to prevent mold.
- Use fresh seeds for the best germination rates.
- Experiment with different seed mixes for flavor variety.
- Try stacking multiple trays to maximize space in small areas.
Growing microgreens with coir sheets is a fun, easy, and eco friendly way to enjoy fresh, nutrient rich greens at home. It’s perfect for kids, beginner gardeners, or anyone looking to add more greenery to their kitchen. With minimal effort, you can enjoy a vibrant, healthy harvest in just a few days.
Disclaimer: This article is provided for general information only and does not constitute engineering, environmental, design, legal, or professional advice. Project-specific advice should always be obtained from suitably qualified professionals.